On the overview screen the following options are available:
: only available on an order that has not yet been printed.
: select a line and then this option to look at more details of that line. Not all fields will be available, depending on which line you choose. See section 211.3.2 for details.
: to (re)print the order.
: when there is more than 1 partial order, this option can be used to switch to the details of another. The system will first display a summary screen.
: only available on an order that has not yet been printed.
: with this option price and invoice number can be entered on an input screen en then be used on the receiving screen (only if receiving has not yet been completed).
: this will switch to the AFO 222 screen. See the help on that AFO for more details.
: only available if an invoice number has been registered for this order.
: this swill switch to a screen with budget details.
: with this option the price can be entered on an input screen en then be used on the receiving screen (only if price information has not yet been entered).
: choose a line and then this option to undo the action. Not available for all actions.
: this will display a brief overview screen of when and by whom the order was created and modified.
: this option will take you back to the search screen.
: this will switch to the display of the order header information.
By selecting one of the line numbers on the overview screen, you can add or modify information in the corresponding fields.
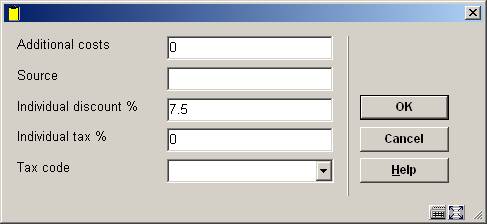
After choosing line 4 an input form for additional financial data is shown:
Enter data as appropriate and click .
After selecting line 5 or 6 you will be taken to an overview screen on which previous notes may be listed:

: use this option to add a new message. See below for more information.
: select a line and then this option to modify the details. See below for more information.
: select a line and then this option to delete it. The system will prompt for confirmation.
, , or : select a line and then use these options to change the status of the message.
After selecting the or option, an input form will be displayed:
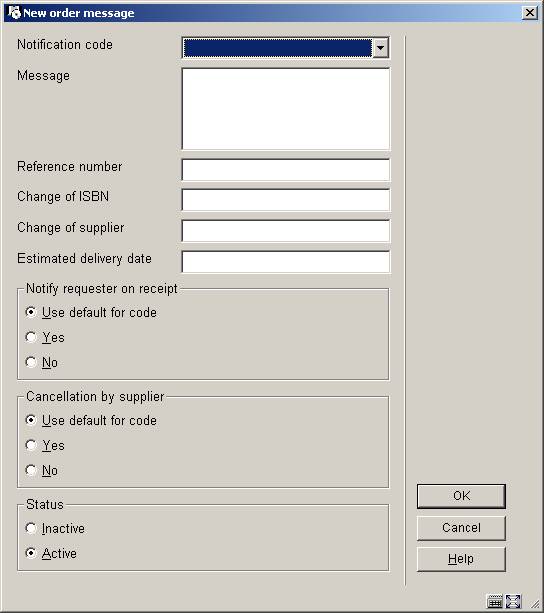
Notification code: choose a notification code from the dropdown list. These codes are defined in AFO 247. Codes can be used to facilitate easy entry, because the system will autimatically retrieve the standard text associated with the code.
Message: alternatively you can enter your own message as free text instead of using a code.
Reference number, Change of ISBN, Change of supplier and Estimated delivery date: optionally enter additional information in any of these fields.
Notify requestor on receipt: check whether or not the requestor must be notified on receipt. If you check ‘Use default for code’ the system will take the setting as defined in AFO 247.
Cancellation by supplier: check whether or not this message means the supplier has cancelled the order. If you check ‘Use default for code’ the system will take the setting as defined in AFO 247.
Status: check whether or not the message is active.
· Document control - Change History
|
Version |
Date |
Change description |
Author |
|
1.0 |
unknown |
creation |
|
|
2.0 |
November 2006 |
updates for release 2.4.2 build 1; added clarification of notes fields; made textual changes (delivered as part of build 1 updates) |
|
|
3.0 |
April 2007 |
Replaced some screen shots |
|